How to Dehydrate Chicken for Survival (With Pictures)
Chicken is one of the most commonly eaten meats in the world, even though it technically isn’t a meat, but rather poultry. You can go just about anywhere in the world and find chicken. Part of that is the rapid reproduction of chicken, when can grow to slaughter size in six week. Another part is that chicken require little care, being able to forage for their food and roost anywhere they can find a low-hanging branch.
All this helps contribute to the low cost of chicken, which in turn, adds to its popularity. For those of us who are preppers, this makes chicken a good choice for animal protein; not just growing it, but also having preserved chicken as part of our stockpile.

Compared to fruits, grains and vegetables, meats are harder to preserve. However, a number of methods of preserving meat have been developed through the centuries, most of which will work just as well for chicken, as they will for any other sort of meat.
Since we’re talking long-term storage of the chicken, I’m going to use a combination of three different methods of preserving it. While I could get away with less, by doing all three, I am increasing the chances that I will be able to store the prepared chicken for many years, without having to worry about it going bad in some way.
The Preserving Methodology
The three methods of preservation I’m going to use for my chicken are:
- Salt – Salt is a natural preservative, drawing moisture out of meat, through osmosis. This also draws moisture out of bacteria cells, killing them. By giving the dehydrated meat a salty surface, we can guarantee that any bacteria that comes into contact with it will die.
- Dehydration – Bacteria need a moist environment to survive. Dehydration denies them that environment, by removing the moisture from the meat they are living in. At the same time, it removes the moisture from the bacteria, killing it.
- Oxygen Deprivation – Some types of bacteria need oxygen to survive. But mold definitely does. So by creating an oxygen starved environment, we can not only reduce the risk of bacterial consumption, but eliminate the possibility of the chicken becoming moldy.
Preparing the Chicken
A basic rule of thumb for drying chicken (or anything else for that matter) is that the thinner it is, the easier it is to dry. for all practical purposes, about the thickest you can reasonably dry is a slice ¼” thick. When it get thicker than that, it’s hard to get the center of the piece to dry fully. That could allow it to harbor dangerous bacterial.
Cutting raw chicken into ¼” thick slices isn’t easy. It helps if the chicken is partially frozen. About 30 minutes in a normal freezer is enough time to stiffen up the meat with enough ice crystals to make it easier to work with, while at the same time keeping it pliable enough to cut. You also want a very sharp non-serrated knife, preferably a French chef’s knife, to work with.

Before slicing the meat, remove all the fat. Fat can turn rancid, even when dried; so you don’t want to dry the chicken with fat on it. Chicken is nice in this, in that the fat only grows between muscles. You don’t see any marbling of the meat, like you do with beef.
Related: How To Make Beef Jerky
Adding the Salt
There are three ways of going about adding salt to the chicken:
- Using a marinate (salty condiments)
- Using a met rub (salt and spices)
- Using a brine (saturated salt water solution)
As you can see, all three of those methods involve using salt. I personally prefer marinating the meat, but that may not be appropriate for all circumstances. If you are going to reconstitute the chicken for use in soups and casseroles, using a marinate will change the flavor. Likewise, most rubs have heavy spice overtones, so they would change the flavor as well.
For the batch I’m making in connection with this article, I have chosen to make the marinade of a combination of teriyaki sauce, soy sauce and oriental orange sauce. Because I am using low sodium soy sauce, I am adding additional salt to the marinade.

Regardless of which method you use, you need to ensure that all the surfaces of each and every slice are covered. This can only happen if you individually dip the slices in the marinade mixture, then place them in a container. Allow that container to sit overnight, so that the flavors from the marinate can soak into the meat. It is a good idea to mix the meat around a couple of times during the night, so as to help ensure that all surfaces are coated.
As you can see from the picture, marinating the chicken changes the color. In this case, this is all white meat, but it has taken on a brownish tint from the marinate.
Dry Marinating the Chicken
The most common way of drying the chicken is in a dehydrator. I prefer using one with a fan, which forces the heated air to move through the racks of meat. This helps to ensure that the meat dries evenly. Less costly dehydrators use only a heating element, located at the bottom of the dehydrator. So the lower racks receive more heat and the meat dries faster. While that isn’t a problem, it does require being more attentive of the dehydrator.
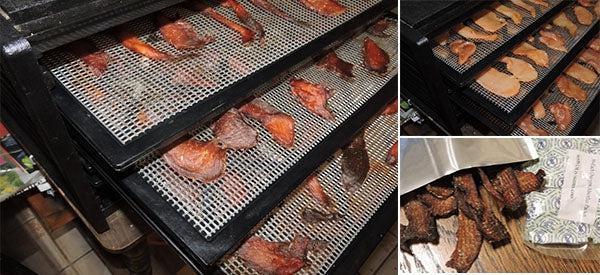
The prepared chicken is placed on the racks of the dehydrator, spread flat and with the pieces not touching. If they touch, they will glue themselves together during the drying process. If they are not flat, they will not dry evenly.

This particular dehydrator has nine racks, allowing me to dehydrate up to eight pounds of meat at one time. For this batch, I’m only using five of the racks.
Chicken, like other meats, should be dried at 160 to 165°F. This is hot enough to kill any bacteria that may be in or on the meat, as the bacteria will die at 158°F. While the actual drying time for your chicken will depend on how thick you slice it, I find that it typically takes six or seven hours to fully dry chicken.

This is the same three racks of chicken, after drying. As you can see, the chicken pieces have shrunk considerably during the process. There is a missing piece in the corner as well, which I would attribute to the cook testing his product. The chicken is also quite dark. This is partially due to the marinate that I used for the chicken and partially due to my slightly “overcooking” the chicken.
Although I call this overcooked, I tend to overcook chicken when I dehydrate it. Raw chicken is dangerous to eat, due to the bacteria that it contains. Since dehydrating is not actually cooking, I personally go for a slightly longer time, so as to ensure that it is fully dry and there is no risk of any bacteria surviving.
Dehydrating Options
While the use of an electric dehydrator is the most common means of dehydrating chicken, there are other methods possible. A solar oven can be used effectively as a dehydrator, especially if you live in the south, where you have very hot sun.

The American Indians used to dry meat in the sun, hanging it on wood poles. While I doubt they ever did this with chicken, they did it with buffalo and venison. So I’m sure it would work with chicken as well. However, without a hot sun, it may not fully dry in one day. If that happens, you’ll have to take the chicken in and refrigerate it overnight, then return it to the drying racks again in the morning.
Finally, it is possible to dehydrate in a regular oven, if you turn the temperature all the way down to its lowest setting. The problem here is that the lowest setting will be warmer than the hottest setting for a dehydrator. So there will be a tendency for the chicken to cook, rather than dehydrate. You can mitigate this problem by cycling the oven on and off periodically.
Packaging the Dehydrated Chicken for Storage
In order to store the now dehydrated chicken for a prolonged period of time, it is good to get it into an oxygen deprived environment. At the same time, you want it to be packaged in a way that prevents pests from getting in and eating it. There are two ways of doing this; either vacuum packing it or packing it in canning jars.
When using canning jars, it is a good idea to use a vacuum sealer for the jars. If you don’t have one, you can eliminate oxygen in the jars by using oxygen absorbers. While normally used when packing food for long-term storage in aluminized Mylar bags, oxygen absorbers work just as well in canning jars.
For vacuum packing, it is best to use aluminized Mylar bags and oxygen absorbers, rather than the normal bags used with a vacuum sealer. This is the same method used for sealing other dry foods for long-term storage. However, instead of using six gallon bags, to fill a five gallon plastic bucket, you will probably want to use smaller bags, like gallon sized ones.

To use this method:
- Before starting, mark the bag with the contents.
- Fill the bag with dried chicken strips, leaving a 2” space at the opening for sealing it.
- Using a hair straightener or clothes iron, partially seal off the opening, leaving just enough room to fit a vacuum cleaner hose into the remaining space.
- Put an oxygen absorber into the bag, though the opening.
- Working quickly, stick a vacuum cleaner hose into the opening and suck out the air, being careful not to suck out any of the chicken or the oxygen absorber.
- Remove the vacuum cleaner hose and seal off the remaining opening with the hair straightener or clothes iron.
While I haven’t fully tested either of these methods of storage for 20 years, I have for two years and can attest that the chicken will stay good for at least that long. Without anything breaking the seal on the packaging, I can’t see any reason why it wouldn’t stay good for much longer.