The Only 4 Knots That You’re Going To Actually Use In A Survival Situation
Share
Tomorrow, as you go through your day, try to keep count of how many fasteners you use. All of them – belts, locks, buttons, zippers, screws, nails, cargo straps, bungees and whatever else you use to hold things together. There are a lot of them, aren’t there?
Now imagine you’re in a crisis situation, you need to fasten things together, and you’re out of the modern fasteners you normally use. What are you going to do now? Most of us could improvise some buttons if we had to, but that’s about as far as it goes. Most of the fasteners we use are beyond our ability to make.
Luckily there’s an older solution. Ever seen an old sailing ship close up? Apart from the nails in the hull, it’s basically held together by knots. For most of human history, knots were how you held things together. The good news is that they still work just fine – if you know how to tie them, of course.
Sailors and fishermen tend to know a lot of knots, but the average American today can probably manage to cope with shoelaces and a tie (and some of us can’t even do that). A perfect Windsor knot will set off a business suit nicely, but it isn’t much use in a survival situation. You need more practical knots for that. Fortunately, you only really need to learn four of them. Master those and you can cope with almost any situation. Here are the essential survival knots.
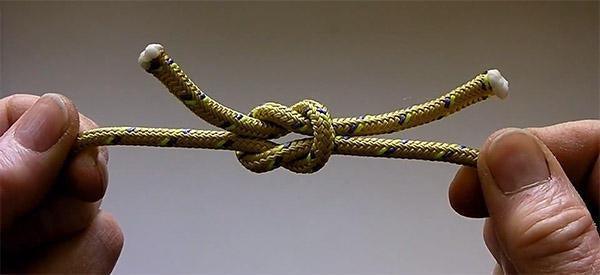
Reef knot

The reef knot is an old sailor’s knot. It was originally used to tie the reef points on a sail – cords that are used to tie part of a sail against the spars, to make it smaller in high winds. This task needs a knot that won’t slip, can be tied and untied in a hurry for fast adjustment of the sails, and that lies flat to avoid wearing holes in the canvas. The reef knot ticks all these boxes.
It’s also a very simple knot to tie.
Simply take the ends of the two ropes and cross them, left over right.
Now double them back on themselves and cross them right over left. Pull the whole thing tight. There you go; you have a reef knot.
A reef knot has several advantages. Although it holds securely, it’s also easy to untie. It’s relatively flat, so it doesn’t slide around as much as some other knots and also creates less wear on any surfaces in contact with it – which is important if you’re lashing a tarp over something you don’t want to get wet, because the reef knot won’t wear holes in it. If you’re using a rope as a belt, a reef knot will lie flat and minimize chafing.
Figure 8 knot
Sometimes you need to tie a stopper knot in a rope or cord to make sure it doesn’t slip out of where it’s supposed to be. That could be the drawstring on your coat’s hood, or the downhaul on a pulley, but either way the principle is the same – if there’s a knot on the end, it will stop the cordage from escaping its task.

The simplest stopper knot, and the one everyone knows, is the pretzel-shaped overhand knot. Unfortunately it’s also a terrible knot, with a nasty habit of binding so tightly against itself under tension that it can never be untied. A much better alternative is the figure 8 knot.
To tie a figure 8 knot, lay the end of the rope over itself to make a loop. Pass the end around the rope, then back through the loop, and pull it tight. You’ll end up with a large and effective stopper knot that won’t bind to itself, so it can be undone. Just don’t tie it too close to the end of the rope – if you do that, occasionally it will undo itself.
Round turn and two half hitches
Ropes usually need to be attached to something, such as a branch, tie-down ring or bollard. A reliable way to do that is with a round turn and two half hitches. This is a strong knot that uses friction against both the support and the rope itself to resist slipping. It also has the advantage that the first part – the round turn – is very easy and quick to do, and will take a lot of the load while you finish it off. That makes it useful for tying up boats, or securing a load that’s already starting to shift.
To tie the knot, get one end of the rope round whatever you want to tie it to, leaving yourself with a good length to work with. If there’s already a load on the rope that lets you snub it, helping to bring the load under control. Now pass the end round again, giving more friction and more control. If the load is very heavy you can add one or more additional turns.
Next, wrap the end round the standing (loaded) part of the rope and pass it through the loop you create. Repeat the process, wrapping it round again and through the new loop. Then just pull the end tight and you’re done. The half hitches you formed by wrapping the end round the standing part will lock off the knot; if you have spare rope you can add more for extra security, but two is usually plenty.
Butterfly knot
Need a secure loop in a rope? There are many ways of doing this, but the butterfly knot is one of the best. Often used by climbers, it’s handy if you can get some slack in the rope and need a loop that won’t slip under a heavy load.

Gather in some slack and form an 8-shaped loop in the rope. Fold the upper loop down, pass it round the rope then thread it through the lower loop and pull it tight. That’s all it takes.
Are these all the knots you can use to help you survive? Nowhere near! There are hundreds of knots, some of them very specialized. The more you can learn, the better equipped you’ll be to survive. These four will cover most things, though. Get some bits of rope and practice until you can tie them confidently, and you’ll have a big advantage when modern fasteners aren’t available anymore.


