How to Make Char Cloth That Catches a Spark Every Time
Most char cloth tutorials teach a cute little camp craft and leave out the parts that actually decide whether you get fire. Bad fabric turns into melted plastic. A tin with the wrong vent burns your cloth to ash. A perfect ember dies in a lousy tinder bundle. That’s why people swear char cloth is unreliable when the real problem is sloppy work.
Char cloth works because you’re not burning cloth in the normal sense. You’re heating natural fiber with limited oxygen until it carbonizes. The National Park Service fire triangle lays out the basic rule plainly: fire needs heat, fuel, and oxygen. Control the oxygen and the cloth chars instead of flaming away to nothing.
The complete system is not just the black square in your kit. Scouting America’s outdoor program material describes fire by flint and steel as using charred cloth, a tinder bundle, and a piece of steel. That’s the part other blogs skip. Char cloth catches a spark and becomes a glowing ember. It does not make a flame by itself. If you don’t have prepared tinder ready, you made a novelty, not a fire starter.
Use 100% cotton or linen, or don’t bother
Char cloth should be made from washed, dry, untreated natural fiber. Use 100% cotton or linen. Old cotton T-shirts, bandannas, denim, flannel, terry cloth, cotton canvas, and linen all work when they’re real natural fiber and not a blend.
The best field-tested choices are old 100% cotton denim and flannel. Denim makes durable char cloth that handles well after cooking. Flannel catches quickly because the fuzzy surface gives sparks more edge and texture to grab. Medium-weight cotton is the easiest starting point if you’re teaching this or making your first batch.
Avoid polyester, nylon, acrylic, spandex, fleece, microfiber, and anything labeled cotton blend. Synthetics melt instead of charring cleanly. Treated fabrics are worse. Flame-resistant workwear, waterproofed cloth, waxed cloth, oily rags, chemically treated fabric, and cloth with rubberized prints or decals do not belong in a char tin. They can resist ignition, melt, stink, or give off bad fumes. This is not the place to get clever with mystery fabric from the garage.
Cut standard fire-kit pieces into 2 in × 2 in squares. For micro kits, 1 in × 1 in squares are enough. For teaching and practice, 2 to 3 in squares are easier to handle with cold fingers and less likely to disappear in the grass. Square size is not magic. Consistent size and loose loading matter more.
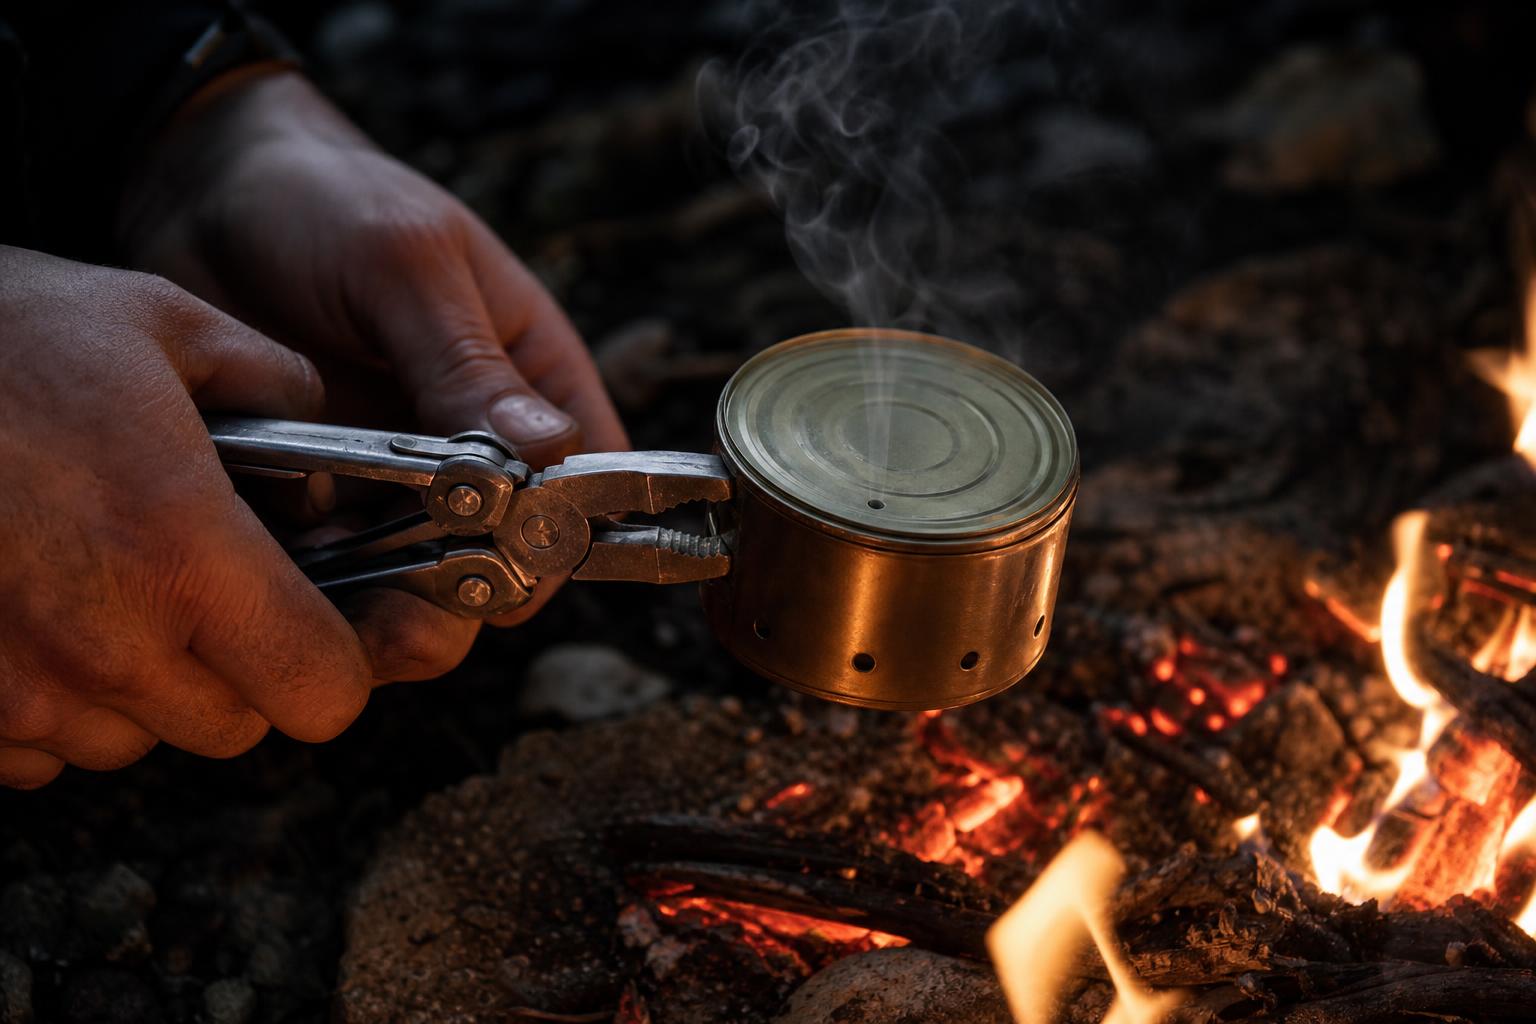
The tin needs one small vent, not a sealed lid
A small metal tin with a lid is the right container. An Altoids-style steel tin works. Punch one vent hole in the lid, about 1/16 in to 1/8 in wide, roughly 1 to 3 mm. That hole lets smoke and gases escape while keeping oxygen limited.
Do not use a fully sealed container. Gases need a way out. Also don’t turn the lid into Swiss cheese. If the opening is too large, too much oxygen gets inside and the cloth can burn to ash instead of carbonizing. One small hole is the boring answer, and it’s the correct one.
Your working setup should be simple:
- Small metal tin with lid: punched with one 1 to 3 mm vent hole.
- Natural-fiber cloth: washed, dry, untreated, and cut into loose squares.
- Heat source: campfire coals, camp stove, grill, or controlled outdoor flame.
- Tongs or pliers: the tin gets extremely hot.
- Fire-safe surface: bare soil, a fire ring, grill grate, or flat rock away from dry grass.
Make char cloth outdoors only. Smoke and gases come out of the vent, and the tin is too hot for casual handling. Use tongs or pliers every time. A lot of people ruin good work by grabbing the tin too soon or setting it down in dry grass like they’re trying to start a second problem.
Loose cloth chars evenly, packed cloth cooks badly
Cut the cloth into squares before it goes into the tin. Stack the pieces loosely. Leave a little air space. Do not cram the tin full and press the lid down like you’re packing tobacco.
Compressed cloth heats unevenly. The outer layers can char while the inner pieces stay undercooked, especially if you’re using heavier cotton like denim or terry cloth. Loose fabric gives the heat a better path through the load. It also makes the finished pieces easier to separate without tearing them to dust.
If you’re making char cloth for a pocket fire kit, make several small batches instead of one overloaded batch. A half-full tin that produces reliable black squares beats a stuffed tin full of brown centers and ash edges. Survival gear should work on the first try. Batch size is not a contest.
Heat the closed tin until the smoke tells you the conversion is happening
Place the closed tin on hot coals, a stove flame, or a grill with the vent hole facing up or slightly sideways. Smoke will come out of the hole. Sometimes the vent gas briefly ignites like a tiny candle flame. That’s normal.
That smoke is the sign that the cloth is being heated in a low-oxygen environment. Keep the tin closed. Don’t lift the lid to peek. Opening the tin early feeds oxygen to hot cloth, exactly the ingredient you’re trying to restrict. The whole technique depends on controlling the fire triangle, not satisfying curiosity.
Heat control does not need to be fancy. Coals are usually easier to manage than a roaring flame. A camp stove or grill works if the tin is stable and you can keep it on a fire-safe surface. The job is to heat the cloth enough to carbonize it, not blast it until the tin glows like a forge.
Watch the vent. When smoke is steady, the process is active. When smoke stops or nearly stops, the visible off-gassing is done. Remove the tin with tongs or pliers and set it on bare soil, a fire ring, a grill grate, or flat rock away from dry grass.
Keep the lid closed while the tin cools. Hot char exposed to fresh oxygen can keep reacting, and the easiest way to ruin a batch is opening the tin while everything inside is still hot. The same oxygen control that made the char cloth also protects it during cooldown.
Good char cloth is black, soft, and still cloth-shaped
Finished char cloth should be black all the way through, lightweight, and still shaped like the pieces you cut. It should hold together when handled gently. It should not be brown in the center, shiny, melted, crispy-white ash, or fused into a plastic-looking lump.
Brown patches mean the cloth did not carbonize fully. Put those pieces back in the tin and heat them again. Ash means too much oxygen, too much heat exposure, too large a vent, or fabric that burned instead of charring. Melted edges or hard beads mean synthetic fiber or a blend slipped into the batch. Throw that failure away and start over with confirmed 100% cotton or linen.
The best char cloth is fragile but not useless. Denim char handles better in a kit. Flannel char tends to grab sparks fast. Cotton T-shirt char works, but thin pieces can tear and crumble after being carried loose. That’s why storage matters.
How do you store char cloth without ruining it?
Store char cloth dry, protected, and separated from crushing pressure. A small tin, film canister-style container, or waterproof pouch inside a hard kit keeps the pieces usable.
Moisture is the enemy because char cloth’s whole job is to accept a spark and hold a glowing ember. Wet char cloth wastes effort. Keep it in the same mental category as dry tinder, not as scrap cloth. If your fire kit rides in a pack that gets rained on, use a container that keeps water out and protects the pieces from being ground into carbon dust.
Don’t store finished char cloth in the same dirty tin you just cooked it in unless the tin is cool, dry, and clean enough not to crush the pieces. Many people use one tin for making and another for carrying. That’s not required, but it keeps your good batch from being beaten up by soot, bent metal, and rough handling.
Carry more than one piece. Char cloth is light. A single 1 in square can start a fire when everything else is prepared, but field conditions punish minimalism. Wind, numb fingers, damp tinder, and one bad transfer can eat your margin fast.
How do you light char cloth with flint and steel?
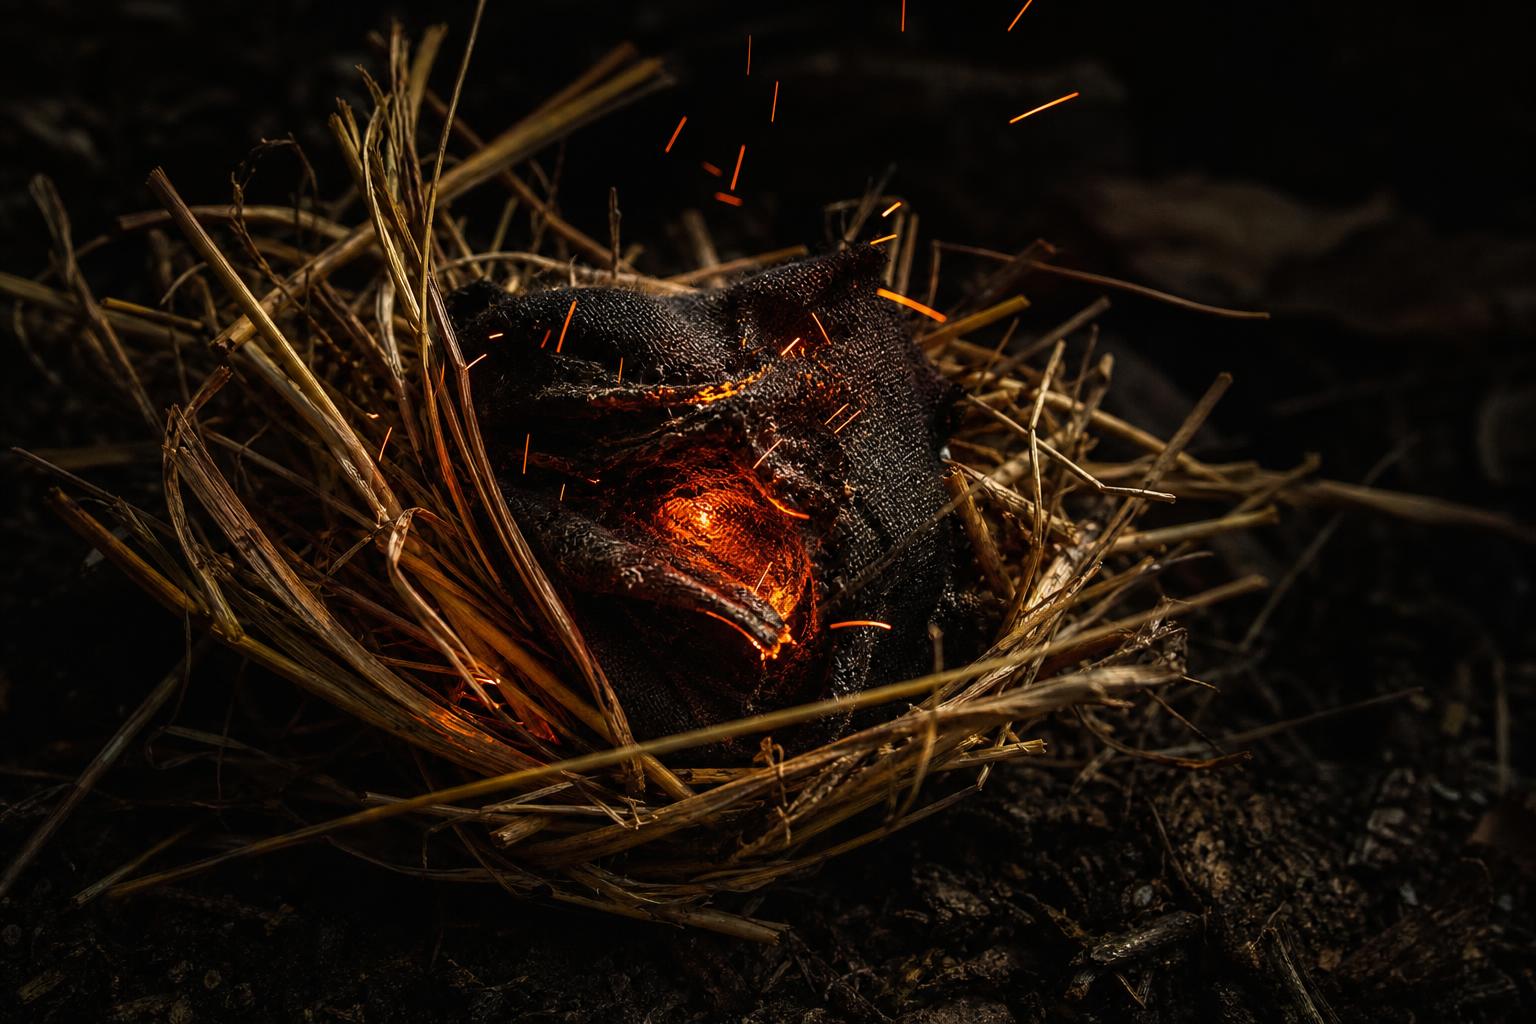
Hold the char cloth close to the striking edge and direct sparks onto one spot until a tiny red-orange ember appears. Once the ember catches, transfer the cloth into a prepared tinder bundle and blow steadily until flame develops.
With traditional flint and steel, the char cloth is not optional window dressing. The Scouting America outdoor program manual specifically names charred cloth, a tinder bundle, and steel as the equipment for this method. The spark has to land on something willing to receive it. Bare sticks are not that thing.
Put the char cloth on top of the sharp flint edge or hold it directly under where sparks fall, depending on your striker style. Strike steel against flint so sparks land on the char. Stop striking once you have an ember. More sparks won’t help if you knock the ember off the cloth.
The transfer is where amateurs lose the fire. Don’t wave the char cloth around in the wind. Don’t pinch the ember out. Lay it into the center of your tinder bundle, close the bundle around it loosely, and blow through the tinder, not at the outside of it. You’re feeding oxygen to the ember and pulling heat into the fine fibers.
Does char cloth work with a ferro rod?
Yes, char cloth works with a ferro rod, but the tinder bundle still decides whether you get flame. A ferro rod throws hot sparks, often rated at 5,400F+, and char cloth catches those sparks as a glowing ember.
This is where modern advice gets lazy. A ferro rod is a spark source, not a complete fire. Scraping it over wet grass and hoping for cinema is nonsense. Char cloth improves ignition because it catches and holds a spark, buying you time to move that ember into real tinder.
Use firm, controlled strokes. Keep the rod close to the char cloth so sparks don’t scatter into the dirt. If your striker throws the tinder bundle everywhere, pin the char cloth down with a fingertip on the edge, keep the ember area exposed, and strike down the rod without bulldozing the whole setup.
A ferro rod with char cloth is one of the better ways to practice DIY water filtration system for survival style discipline in another survival category: build the full system before you need it. Water purification fails when people only think about the filter. Fire fails when people only think about the spark.
Your tinder bundle matters as much as the char cloth
A prepared tinder bundle should be fine, dry, and airy enough to let oxygen move through it. Char cloth supplies an ember, not a flame. The tinder bundle turns that ember into flame.
Use fine natural tinder. Dry grass, shredded bark, plant fibers, and similarly fine material give the ember enough contact and airflow. The center should be the finest material you have. Coarser material belongs outside that core, where it can catch after the ember has grown.
If the tinder feels cool against the back of your hand, it’s still too damp for dependable spark ignition. Damp tinder steals heat from the ember. You can have perfect char cloth and a clean spark source and still fail because your tinder bundle is a cold wet sponge dressed up as bushcraft.
Form the bundle before striking. This is non-negotiable. The ember on char cloth is useful, but it is not a campfire. Once it appears, the clock starts. Have the nest in your hand, open it, place the ember in the center, close the fibers around it, and blow. Start gently. Increase airflow as smoke thickens. Hard blasting too early can cool or dislodge the ember.
Fire is a chain: spark, ember, tinder, kindling, fuel. Char cloth only covers the spark-to-ember link. If your pencil-lead-size twigs and pencil-size kindling are not ready, you’ll celebrate a flame for three seconds and then watch it die. That’s not a char cloth failure. That’s poor fire lay preparation.
The fastest troubleshooting chart for bad char cloth
Failures usually point to one of four problems: wrong fabric, bad venting, bad cook, or bad tinder. Don’t guess. Read the evidence.
- Cloth melted or formed hard beads: you used synthetic fabric or a blend. Use confirmed 100% cotton or linen.
- Cloth turned to ash: too much oxygen got into the tin, the vent was too large, the lid fit poorly, or the cloth burned instead of carbonizing.
- Cloth stayed brown inside: the batch was undercooked or packed too tightly. Loosen the load and heat again.
- Cloth catches ember but no flame follows: the tinder bundle is damp, too coarse, too tight, or not ready before ignition.
- Char cloth crumbles in storage: protect it from crushing and carry it in a small hard container.
- Smoke pours from every seam: the tin may still work, but a loose lid gives oxygen more ways in. Use a tighter metal tin with one controlled vent hole.
Make test fires with your own batch before adding it to an emergency kit. One spark test tells you more than ten perfect-looking black squares. Practice with flint and steel and with a ferro rod, because different spark sources demand different hand positions. The goal is not to admire your char cloth. The goal is fire without matches.
Build char cloth into a real fire kit
A sensible spark-based fire kit has redundancy without turning into a junk drawer. Pack char cloth, a spark source, and tinder preparation tools or tinder material. If you’re carrying flint and steel, char cloth earns its space. If you’re carrying a ferro rod, char cloth still earns its space because it turns scattered sparks into a manageable ember.
Use one container for finished char cloth, not loose squares floating around with knives, cordage, and crumbs. Add dry tinder or a way to make it. A sharp edge for scraping bark and producing fine fibers belongs close to your fire kit. Fire starting is often less about the first spark and more about material preparation.
Practice in controlled conditions first, then practice when it’s inconvenient. Cold hands change everything. Wind changes everything. Damp ground changes everything. If your only successful burn happened on a picnic table in dry weather, you don’t have a field-proven method yet.
Char cloth also fits into a broader survival load where fire, water, shelter, and food all support each other. If you’re building long-term skills instead of collecting tricks, food preservation skills like pemmican: survival food, jerky, hunting belong in the same training mindset: simple materials, correct process, tested results.
FAQ
Can you make char cloth from a cotton blend?
No. Use 100% cotton or linen. Cotton blends can include polyester, nylon, spandex, or other synthetics that melt instead of charring cleanly.
Why does my char cloth glow but never make flame?
Char cloth is only an ember carrier. It has to be placed into fine, dry, airy tinder and blown into flame. If the tinder bundle is damp, coarse, or packed too tight, the ember dies.
How big should char cloth pieces be?
Standard pieces are 2 in × 2 in. Tiny kits can use 1 in × 1 in pieces. For practice and teaching, 2 to 3 in squares are easier to handle.
Make the batch before you need the fire
Char cloth is simple, but simple is not the same as careless. Use the right fabric. Punch one small vent hole. Load the tin loosely. Heat it outdoors with the lid closed. Store the finished squares dry and protected. Then practice with a real spark source and a prepared tinder bundle until the sequence is boring.
The survival internet loves recipes that stop at the neat part. A black square in a tin is not the finish line. Flame is the finish line. Build the whole system and test it before weather, stress, and cold hands get a vote.
For more field-ready skills you can print, pack, and actually use, download the free survival guide PDFs from American Survivalist.
Give your char cloth a spark worth catching
Char cloth is only as good as the sparks you rain onto it, and a weak striker leaves you nursing a dead ember. Our half-inch ferro rod throws a shower of hot sparks that a fresh square of char cloth grabs on the first pass, wet or dry, and it keeps doing it past 15,000 strikes. The kit ships with a hardened steel striker that has a real squared edge, so you're peeling sparks off cleanly instead of skating a dull spine down the rod. Add the Large Ferro Rod and striker to your fire kit, then grab our free survival guides to lock in the rest of the chain from spark to fuelwood.